Summary
This article explains how Plus Groups allow modifications to menu items with predefined options, some of which may include additional charges. When using prep dockets, selected pluses are printed beneath each menu item for kitchen staff reference.
Step 1: Creating the Plus Group
- Log in to OfficeMAte
- Navigate to the 'Plus Groups' screen in the navigation panel.

- Select the 'New Group' icon from the toolbar at the top right of the screen.

- The details of the Plus Group will now be visible.
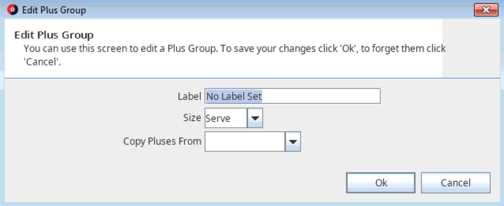
Step 2: Editing the Plus Group
- Label: Name the Plus Group so it is easily identifiable when attaching to menu items and when searching reports.
- Size: If menu items have multiple sizes, multiple Plus Groups may be required.
- Copy Pluses From: Pluses from an existing group can be copied into the new Plus Group.
- To save the changes, select 'OK'.
- To discard the changes, select 'Cancel'.
Step 3: Adding the Pluses to the Group
- Click the 'New Plus' icon from the toolbar at the top left of the screen.

- Once created, plus will appear and require editing.

Editing Plus Details
- Name: This will print on the prep docket and Tax Invoice.
- Price: Add a price if this plus attracts an addition charge.
- Sequence: Assign a numerical sequence to override the default alphabetical display order in WaiterMate.
- Background Colour: Select the button colour in WaiterMate.
- Foregound Colour: Select the font colour in WaiterMate.
- Add Group: Move this plus to another plus group if needed.
- Repeat the above steps for all required pluses.
- Once completed, select 'Save' from the toolbar at the top of the screen.
Step 4: Attaching the Plus Group to the Menu Item

- Navigate to the 'Items' screen in OfficeMate (see ‘Creating Menu Items’)
- Select the menu item to attach the plus group to.
- Click the tick box 'Show Extended View' from the top right of the screen to make more columns visible

- Scroll to the right and locate the 'Plus Group' field.

- Click in the field to see a drop-down list of available Plus Groups.
- Select the appropriate Plus Group for the menu item.
- Note: Only one Plus Group can be assigned per menu item.
- Select the 'Save' icon to finalise the changes.
