Summary
This article explains how 'Option Groups' streamline the ordering process by displaying an automatic selection screen when attached to a menu item. These groups can enforce minimum and maximum selections, guiding users through menu choices efficiently. Individual options can also include additional charges if required.
Step 1 - Creating the Option Group
- Log in to OfficeMate.
- Navigate to the 'Options' screen in the navigation panel.

- Select the 'New Group' icon located on the toolbar at the top right of the screen.

- The Option Group details will now be visible.
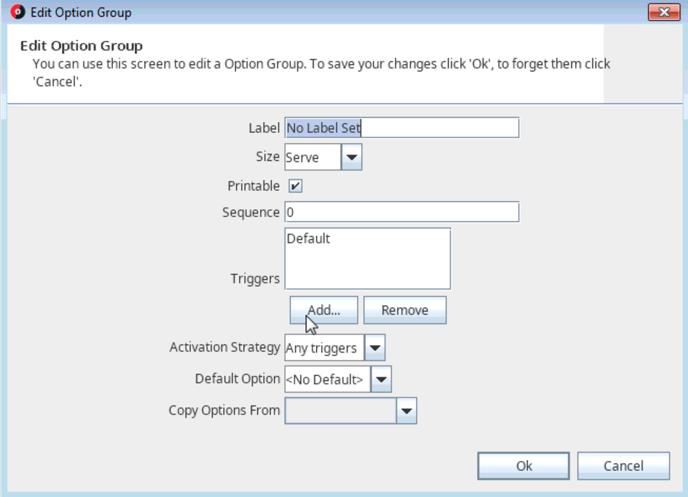
Step 2: Editing the Option Group
- Label: Name the option group so it can be easily identified when attaching to menu items and also when searching the option reports.
- Size: Multiple sized option groups may be required for multiple sized menu items.
- Printable: Select if these options are required to print on the prep docket.
- Sequence: Option groups can be given a numerical sequenced to override the alphabetical order.
- Triggers: Attach or remove any triggers required to activate this option group by selecting ‘Add’ or ‘Remove’ (see creating triggers).
- Activation Strategy: If multiple triggers are attached, choose if ‘All Triggers’ or ‘Any Triggers’ are required to activate this option group.
- Default Option: Once the options have been created, any of the options can be set as the default so that if another option is not chosen, it will be automatically selected.
- Copy Options From: Options within this group can be copied from an existing group.
To save the changes select ‘OK’.
To forget changes select ‘Cancel’.
Step 3: Adding the Options to the Group
- To create new options within the option group, click on the 'New Option' icon located on the toolbar at the top left of the screen.

- Once the option is created, it will appear and require editing.
Editing Option Details
- Name: This will print on the prep docket and Tax Invoice.
- Price: Add a price if this option has an additional charge.
- Sequence: Assign a numerical sequence to override the alphabetical order in WaiterMate
- Background Colour: Select the button colour in WaiterMate.
- Foreground Colour: Select the font colour in WaiterMate
- Option Group: Moce the option to another option group if needed.
- Reduced Factor: Set the discount percentage for the item if a reduced zone is applied. if set to 0%, the item will always be charged at full price.
- Repeat these steps for all options in the group.
- Once all options are added and edited, select 'Save' from the toolbar at the top of the screen.

Step 4: Attaching the Option Group to the Menu Item

- Navigate to the 'Items' screen in OfficeMate.
- Select the menu item to attach the option group to.
- Click the tick box 'Show Extended View' at the top right to display more columns.

- Scroll to the 'Option Group' field.

- Choose the desired option group from the list.

- Once selected, you can edit the option group details as follows:

- Option Group: Displays the option group name.
- Sequence: Determines the order in which the option screen appears if multiple otion groups are attached.
- Min Qty: The minimum number of options a user must select
- Max Qty: The maximum number of options a user can select
- Reduced Zone: The number of items charged at the reduced factor before full price applies. If set to 'Zero, all options will be charged at full price.
- Select 'OK' to confirm the changes.
- From the item screen, select the 'Save' icon to finalise the updates.