Summary
This article will explain how to take and save a deposit in WaiterMate and how to use the deposit at a later date.
Although all accounts should typically be closed at the end of each trading day, payments can be stored using the debtor module. Deposits can be made in advance via the debtor tab for 'Deposits' and later recalled when needed, offering a convenient way to manage prepayments.
Step 1 - Creating the Debtor
Before receiving payments, a debtor account must first be created in WaiterMate by following these steps:
- Open WaiterMate and select the Debtor Tab from the top of the screen.
- Select on the 'New' icon at the bottom right of the screen

- Once selected the following box will be displayed and can be edited as explained below:

- Account Name: Used to identify the debtor in both WaiterMate and in OfficeMate
- Account Group: Select an existing group or create a new one for easier search and reporting.
- Credit Limit: Set this to 'Zero' to prevent the debtor from going into credit.
- Invoice Requires Note: If selected, a note will be prompted when sending sales to the debtor. Typically this is not needed for gift vouchers or deposits
- Click ‘Ok’ to confirm.
- Select the ‘Show All Debtors’ icon at the bottom left of the screen to refresh the debtors list

- The debtor will be shown with a balance of $0.00, meaning the account is inactive until a payment is made.

Step 2 - Making a Payment to the Debtor
Once the debtor is created, a payment can be processed:
- Select the debtor, then select the ‘Pay’ icon at the bottom right of the screen.

- Choose the Payment Method.
- The 'Paid' amount will automatically match the debtor's balance. Adjust the 'Paid' figure if necessary by entering the amount received.
- Update the 'Amount Tendered' to reflect the payment received.
- Select 'OK' to confirm and select Save to complete the payment.
- To Exit, click the 'Back' icon at the bottom left of the screen.

- The debtor will now display in blue with a negative balance, indicating it is in credit.

Step 3 - Apply the deposit payments
There are two main ways to apply debtor payments
Example 1 - Apply Previous Transaction
- Process the customer’s order as usual.
- At the payment screen, click the 'Pay' icon.
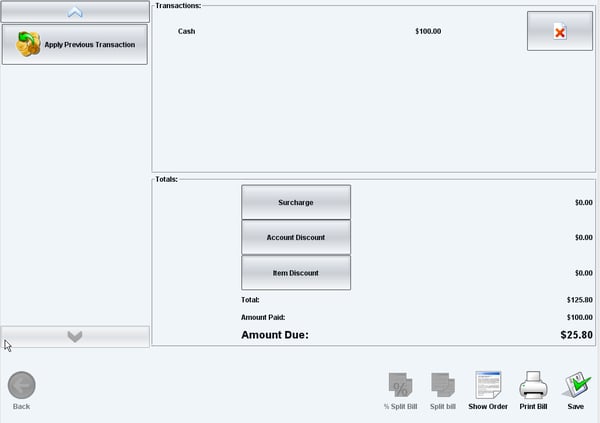
- Scroll down to select 'Apply Previous Transaction' from the payment types.

- In the Debtor screen, search for the relevant debtor and select it.
- Any previous payments will be listed. Select the desired payment(s). It is possible to make multiple payments to the same debtor.

- Select 'Use Selected Payments' to apply the payment to the sale. This will adjust thebalance as is a 'Part Payment' was made.

Example 2a - Sending a Sale to a Debtor
- Process the customer's order as usual.
- At the payment screen, choose 'Customer Account' from the payment types.

- Search for and select the desired debtor.
- The sale will be transferred to the debtor, and no longer show as an active sale.
- To view the debtors balance and activities, select 'Show all Debtors' from the bottom of the debtor screen.
Here, payments (right side) and sales (left side) linked to the debtor will be visible.
Example 2b - Part Payments
- Process the customer’s order as usual.
- Make a part payment to cover the difference between the sale and the debtor balance (see making part payments)
- Follow the above steps for sending a sale to a debtor to use the deposit balance for the remaining payment.
Notes on Deleting Debtors
Debtors with a $0 balance won't be deleted automatically. To delete a debtor:
- Ensure the balance is $0.
- Open OfficeMate and delete the debtor from the debtor page.